:%s/[Ctrl-v][Enter]//g 删除DOS方式的回车^M
:%s= *$== 删除行尾空白
:%!sort -u 删除重复行
:%s/^.{-}pdf/new.pdf/ 只是删除第一个pdf
:%s/// 删除多行注释
:g/^$/d 删除所有空行
:g!/^dd/d 删除不含字符串'dd'的行
:v/^dd/d 删除不含字符串'dd'的行
:g/str1/,/str2/d 删除所有第一个含str1到第一个含str2之间的行
:v/./.,/./-1join 压缩空行
:g/^$/,/./-j 压缩空行
ndw 或 ndW 删除光标处开始及其后的 n-1 个字符。
d0 删至行首。
d$ 删至行尾。
ndd 删除当前行及其后 n-1 行。
x 或 X 删除一个字符。
Ctrl+u 删除输入方式下所输入的文本。
D 删除到行尾
x,y 删除与复制包含高亮区
dl 删除当前字符(与x命令功能相同)
d0 删除到某一行的开始位置
d^ 删除到某一行的第一个字符位置(不包括空格或TAB字符)
dw 删除到某个单词的结尾位置
d3w 删除到第三个单词的结尾位置
db 删除到某个单词的开始位置
dW 删除到某个以空格作为分隔符的单词的结尾位置
dB 删除到某个以空格作为分隔符的单词的开始位置
d7B 删除到前面7个以空格作为分隔符的单词的开始位置
d) 删除到某个语句的结尾位置
d4) 删除到第四个语句的结尾位置
d( 删除到某个语句的开始位置
d) 删除到某个段落的结尾位置
d{ 删除到某个段落的开始位置
d7{ 删除到当前段落起始位置之前的第7个段落位置
dd 删除当前行
d/text 删除从文本中出现“text”中所指定字样的位置,一直向前直到下一个该字样所出现的位置(但不包括该字样)之间的内容
dfc 删除从文本中出现字符“c”的位置,一直向前直到下一个该字符所出现的位置(包括该字符)之间的内容
dtc 删除当前行直到下一个字符“c”所出现位置之间的内容
D 删除到某一行的结尾
d$ 删除到某一行的结尾
5dd 删除从当前行所开始的5行内容
dL 删除直到屏幕上最后一行的内容
dH 删除直到屏幕上第一行的内容
dG 删除直到工作缓存区结尾的内容
d1G 删除直到工作缓存区开始的内容
vim中删除技巧
Aug 13, 2010 08:31:52 AM
VIM LaTeX Suite 正向反向搜索配置
Aug 11, 2010 06:53:28 AM
本页主要讲述安装 VIM LaTeX Suite 后, 如何配置正向、反向查找。 关于 VIM LaTeX Suite 的下载地址, 可以在 VIM 常用插件简介页面中找到, 安装步骤请参看说明书, 这里不再详细解说。
1 简介
正向搜索指的是在生成的 dvi 文件中 查找 LaTeX 源代码中指定位置所对应的 dvi 段落、图表或其它元素; 反向搜索指的是在生成的 dvi 文件中查找指定段落、图表或其它元素 所对应源代码的位置。
众所周知, LaTeX 并不是一个“所见即所得”的编辑环境, 因此许多时候我们需要通过反复编译、查看效果来调节我们编写的代码。 正向搜索可以为代码的调节工作带来极大便利 ──当我们修改了一段代码后, 只需要编译它, 然后通过正向搜索直接跳转到 dvi 中与该段对应的位置, 即可立即直接查看到这段代码的效果。
而反向搜索在校对稿件的时候尤其有用。 当发现了错别字或病句的时候, 可以通过 dvi 文件反向搜索源代码位置, 快速跳转到源代码中的相应位置, 以便迅速而方便地修改这个错误。
2 Linux 下针对 xdvi 的配置
2.1 修改 .tex 文件的打开方式
VIM 打开文件的时候, 为了提高效率, 会为文件生成一个 swap 文件, 因此同一个文件是不能在多个不同的 VIM 下重复打开的。 为了让反向搜索能够正常工作, 我们必须让 VIM 运行在 remote 模式下。 在这里, 我们通过修改 .tex 的打开方式来实现这一点。
KDE 下的修改方法:
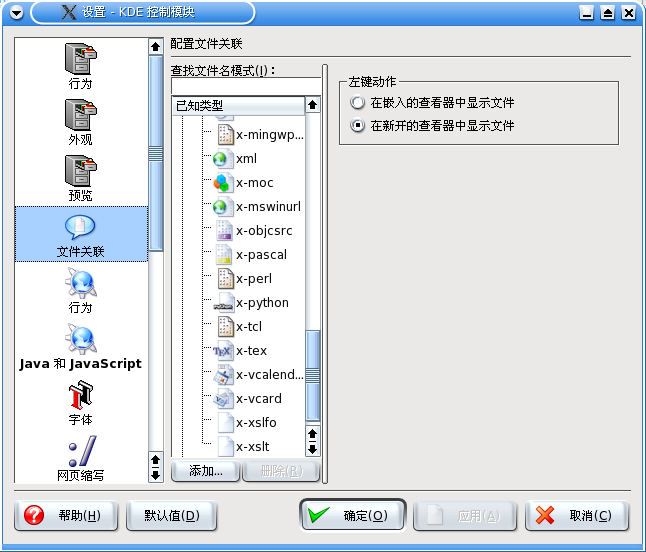
打开 Konqueror, 点“设置”→“配置 Konqueror”, 在弹出的对话框中选择“文件关联”, 在右侧的窗口中找到“已知类型”→“text/x-tex”, 如图所示。 如果不存在 text/x-tex 项的话, 就自己新建一个。 选中 x-tex, 在右侧窗口中点击“添加”, 然后在弹出的窗口中输入:
gvim --servername "latex-suite" --remote-silent "%f"
注意: VIM7 目前暂不支持为不同的文件生成不同的 ViewRule, 因此在 VIM7 下暂时不能使用为不同的文件选择不同的 servername 功能。 如果你使用 VIM7 的话, 这里的 servername 参数请使用 latex-suite。
点击“确定”后使用“上移”按钮, 将新建的打开方式移动到列表的第一位, 使它成为 .tex 文件的默认打开方式。 之后在 Konqueror 中双击 .tex 文件时, 将使用 remote 模式的 VIM 打开。 关于 remote 模式的详细介绍, 请参看 VIM 的用户手册:
:help remote
2.2 修改 .vimrc,支持 xdvi
作者仅在 TeXLive 2004 下测试过 xdvi 的搜索功能, 在低版本的 xdvi 下也许无法使用, 请尽量升级到最新版本。
为了能正常使用正向、反向搜索 需要让编译得到的 dvi 具有源代码的行号信息。 我们在调用 latex 的时候提供“-src-specials”参数 来生成带有行号信息的 dvi 文件。 在你的 .vimrc 中添加以下内容:
let g:Tex_CompileRule_dvi="latex -src-specials -interaction=nonstopmode $*"
为了能够使用反向搜索, 必须让 xdvi 知道当前编辑器是工作在 remote 模式下的 VIM, 以便在用户搜索的时候调用编辑器显示查找结果。 由于 remote 模式的 servername 是根据命令行确定的, 因此不同的文件 servername 不一样, 如何在 VIM 里识别这个名字就成了一个问题。 滇狐目前使用 autocommand 的形式获取这个参数, 比较不优雅, 有很重的“hack”的痕迹。 如果有更好的主意, 请务必与滇狐联系。 在你的 .vimrc 中添加以下内容:
function RemoteLaTeX()
let g:Tex_ViewRule_dvi="xdvi -editor 'gvim --servername \"".expand("%:p")
\."\" --remote-silent'"
augr remotelatex
au!
augr END
endfunction
let g:Tex_ViewRule_dvi="xdvi -editor 'gvim --servername \"".expand("%:p")
\."\" --remote-silent'"
augr remotelatex
au!
augr END
endfunction
配置完毕后存盘退出, 现在 VIM LaTeX 套装就能够配合 xdvi 工作了。
2.3 命令行工具
使用这样的方式开启 gVim, 需要在命令行给出文件的全路径, 以便正确设置 servername。 如果在 Konquerer 里双击打开, 它把文件的全路径传递给 gVim, 能够正常工作。 但如果在命令行下启动 gVim 的话, 手工设置正确的命令行就比较不容易了。 因此, 如果在命令行下编辑 LaTeX 文档, 请使用这段 Shell 脚本启动 gVim:
#!/bin/sh
if [ $# -lt 1 ]; then
echo Usage: gvim-latex filename
else
for i in "$@"
do
gvim --servername latex-suite --remote-silent "$i"
done
fi
if [ $# -lt 1 ]; then
echo Usage: gvim-latex filename
else
for i in "$@"
do
gvim --servername latex-suite --remote-silent "$i"
done
fi
使用方法是:
gvim-latex my-latex-file.tex
2.4 使用方法
通过双击 .tex 文件的方式打开 remote 模式的 VIM (如果觉得有必要的话, 可以再写一个 sh 脚本, 用来启动 remote 模式的空 VIM), 然后编辑 .tex 文件。 编辑完毕后在 normal 模式下按“\ll”命令编译文件。 编译成功后, 将光标移动到想要查看效果的 LaTeX 源代码上方, 然后在 normal 模式下按“\ls”, VIM 会打开一个 xdvi, 并自动跳转到该源代码所对应的位置上。 在 xdvi 中按住 Ctrl 键单击页面元素, 便可在 VIM 中自动跳转到相应的源代码处。 反向搜索时,最好展开 VIM 中的所有 folder。
3 Windows 下针对 yap 的配置
3.1 修改 .tex 文件的打开方式
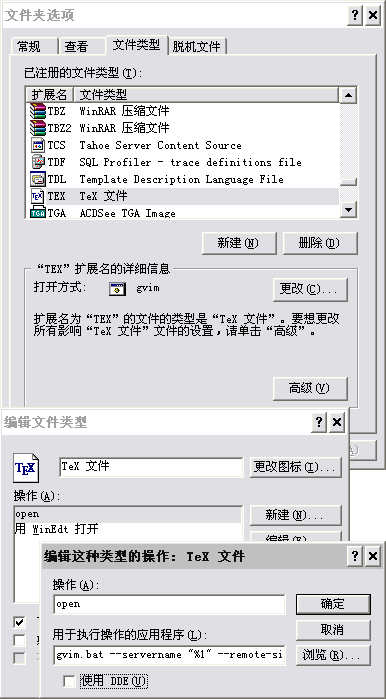
打开资源管理器, 点击“工具”→“文件夹选项”, 在弹出的对话框中选择“文件类型”。 在“已注册的文件类型”列表中任意选择一个, 然后在键盘上快速输入“tex”, 定位到 .tex 文件的打开方式项上。 如果不存在 .tex 文件类型的话, 点击“新建”创建一个。
选中 .tex 文件类型后, 点击窗口下方的“高级”按钮, 在弹出的窗口中修改默认打开方式的命令行。 如果所有打开方式均没有设为默认的话, 则“open”为默认打开方式。 选中要编辑的打开方式, 单击“编辑”按钮, 在弹出的窗口中输入命令行为:
gvim.bat --servername "%1" --remote-silent "%1"
这里使用文件的全路径作为 servername, 这样编辑不同的文件就可以使用不同的 gVim 而不用担心出现任何冲突, 感谢华宇煜提出这个创意。
注意: VIM7 目前暂不支持为不同的文件生成不同的 ViewRule, 因此在 VIM7 下暂时不能使用为不同的文件选择不同的 servername 功能。 如果你使用 VIM7 的话, 这里的 servername 参数请使用 latex-suite。
单击确定后退出文件夹选项对话框, 之后双击 .tex 文件后将使用工作在 remote 模式的 VIM 打开。
3.2 修改 _vimrc,生成搜索数据
为了能正常使用正向、反向搜索需要让编译得到的 dvi 具有源代码的行号信息。 我们在调用 latex 的时候提供“-src-specials”参数 来生成带有行号信息的 dvi 文件。在你的 .vimrc 中添加以下内容:
let g:Tex_CompileRule_dvi="latex -src-specials -interaction=nonstopmode $*"
3.3 修改 yap 配置,支持 VIM
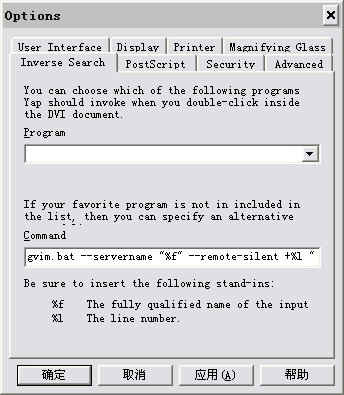
打开 yap, 点击菜单“View”→“Options”, 在弹出的对话框中选择“Inverse Search”选项页, 在“Command”下方的文本框中写上:
gvim.bat --servername "%f" --remote-silent +%l "%f"
“确定”后就可以使用 yap 的反向搜索功能了。
注意: VIM7 目前暂不支持为不同的文件生成不同的 ViewRule, 因此在 VIM7 下暂时不能使用为不同的文件选择不同的 servername 功能。 如果你使用 VIM7 的话, 这里的 servername 参数请使用 latex-suite。
无须配置正向搜索,VIM LaTeX Suite 里已经内置了正向搜索的相关配置。
3.4 使用方法
通过双击 .tex 文件的方式打开 remote 模式的 VIM (如果觉得有必要的话, 可以再写一个批处理文件, 用来启动 remote 模式的空 VIM), 然后编辑 .tex 文件。 编辑完毕后在 normal 模式下按“\ll”命令编译文件。 编译成功后, 将光标移动到想要查看效果的 LaTeX 源代码上方, 然后在 normal 模式下按“\ls”, VIM 会打开一个 yap, 并自动跳转到该源代码所对应的位置上。 在 yap 中双击页面元素, 便可在 VIM 中自动跳转到相应的源代码处。 反向搜索时, 最好展开 VIM 中的所有 folder。
4 综述
VIM LaTeX Suite 是一套非常优秀的插件, 具有很强的可扩展性。 如果你使用的 dvi 查看器不在上面列出的范围之内, 只要查看器支持, 都可以通过相关配置很方便地整合到 VIM 中。
Vi and Vim Editor: 12 Powerful Find and Replace Examples
Aug 11, 2010 06:51:35 AM
This article is part of the on-going Vi / Vim Tips and Tricks series. Vim is commonly mentioned as text editor, not text creator. Why ? Because we spend lot of time editing an existing text than creating new text. In the text editing, text/pattern substitutions becomes a vital part.
In this article, let us review how to perform both basic and advanced text and pattern substitution features in Vi and Vim Editor. These features are explained using 12 very practical and powerful text substitution examples.
Syntax of the text substitution inside vim editor:
:[range]s[ubstitute]/{pattern}/{string}/[flags] [count]
Following are three possible flags.
- [c] Confirm each substitution.
- [g] Replace all occurrences in the line.
- [i] Ignore case for the pattern.
Example 1. Substitute all occurrences of a text with another text in the whole file
This is the basic fundamental usage of the text substitution inside Vi editor. When you want a specific text to be replaced with another text in the entire file then you can use the following sequence.
:%s/old-text/new-text/g
- %s – specifies all lines. Specifying the range as ‘%’ means do substitution in the entire file.
- g – specifies all occurrences in the line. With the ‘g’ flag , you can make the whole line to be substituted. If this ‘g’ flag is not used then only first occurrence in the line only will be substituted.
Example 2. Substitution of a text with another text within a single line
When you want a specific text to be replaced with another text within a single line in a case insensitive manner. Specifying no range means, do substitution in the current line only. With the ‘i’ flag, you can make the substitute search text to be case insensitive.
:s/I/We/gi
Example 3. Substitution of a text with another text within a range of lines
With the range, you can make only a range of line to be affected in the substitution. Specifying 1, 10 as range means, do substitution only in the lines 1 – 10.
:1,10s/helo/hello/g
Example 4. Substitution of a text with another text by visual selection of lines
You can also select a specific lines by visually selecting those lines. Press CTRL + V in command mode, use navigation keys to select the part of the file you want to be substituted. Press ‘:’ which will automatically formed as :’<,’> Then you can use the normal substitute as
:'<,'>s/helo/hello/g
Example 5. Substitution of a text with another text only the 1st X number of lines
Using count in substitution, If you specify the count N in the substitution then it means do substitution in N lines from the current position of the cursor. do substitution in 4 lines from the current line.
:s/helo/hello/g 4
Example 6. Substitute only the whole word and not partial match
Let us assume that you want to change only the whole word ‘his’ to ‘her’ in the original text mentioned below. If you do the standard substitution, apart from changing his to her, it will also change This to Ther as shown below.
Standard Subsitution
Original Text: This is his idea
:s/his/her/g
Translated Text: Ther is her idea
Whole Word Subsitution
Original Text: This is his idea
:s/\<his\>/her/
Translated Text: This is her idea
Note:: You should enclose the word with < and > , which will force the substitution to search only for the full word and not any partial match.
Example 7. Substitute either word1 or word2 with a new word using regular expression
In the following example, it will translate any occurrences of either good or nice will be replaced with awesome.
Original Text: Linux is good. Life is nice.
:%s/\(good\|nice\)/awesome/g
Translated Text: Linux is awesome. Life is awesome.
You can also do substitution by specifying regular expression. Following example does the substitution of hey or hi to hai. Please note that this does not do any substitution for the words ‘they’, ‘this’.
:%s/\<\(hey\|hi\)\>/hai/g
- \< – word boundary.
- \| – “logical or” (in this case hey or hi)
Example 8. Interactive Find and Replace in Vim Editor
You can perform interactive find and replace using the ‘c’ flag in the substitute, which will ask for confirmation to do substitution or to skip it as explained below. In this example, Vim editor will do a global find the word ‘awesome’ and replace it with ‘wonderful’. But it will do the replacement only based on your input as explained below.
:%s/awesome/wonderful/gc
replace with wonderful (y/n/a/q/l/^E/^Y)?
- y – Will replace the current highlighted word. After replacing it will automatically highlight the next word that matched the search pattern
- n – Will not replace the current highlighted word. But it will automatically highlight the next word that matched the search pattern
- a – Will substitute all the highlighted words that matched the search criteria automatically.
- l – This will replace only the current highlighted word and terminate the find and replace effort.
Example 9. Substituting all lines with its line number.
When the string starts with ‘\=’, it should be evaluated as an expression. Using the ‘line’ function we can get the current line number. By combining both the functionality the substitution does the line numbering of all lines.
:%s/^/\=line(".") . ". "/g
Note: This is different from the “:set number” where it will not write the line numbers into the file. But when you use this substitution you are making these line number available inside the file permanently.
Example 10. Substituting special character with its equivalent value.
Substituting the ~ with $HOME variable value.
Original Text: Current file path is ~/test/
:%s!\~!\= expand($HOME)!g
Translated Text: Current file path is /home/ramesh/test/
You can use expand function to use all available predefined and user defined variables.
Example 11. Alter sequence number in a numbered list while inserting a new item
Assume that you have a numbered list like the following inside a text file. In this example, let us assume that you want to add a new line after Article 2. For this, you should change the number of all other articles accordingly.
vi / vim tips & tricks series
Article 1: Vi and Vim Editor: 3 Steps To Enable Thesaurus Option
Article 2: Vim Autocommand: 3 Steps to Add Custom Header To Your File
Article 3: 5 Awesome Examples For Automatic Word Completion Using Ctrl-X
Article 4: Vi and Vim Macro Tutorial: How To Record and Play
Article 5: Tutorial: Make Vim as Your C/C++ IDE Using c.vim Plugin
Article 6: How To Add Bookmarks Inside Vim Editor
Article 7: Make Vim as Your Bash-IDE Using bash-support Plugin
Article 8: 3 Powerful Musketeers Of Vim Editor ? Macro, Mark and Map
Article 9: 8 Essential Vim Editor Navigation Fundamentals
Article 10: Vim Editor: How to Correct Spelling Mistakes Automatically
Article 11: Transfer the Power of Vim Editor to Thunderbird for Email
Article 12: Convert Vim Editor to Beautiful Source Code Browser
3rd Article “Make Vim as Your Perl IDE Using perl-support.vim Plugin” got missed. So when you want
to add it, then you want to change “Article 3″ to “Article 4″, “Article 4″ to “Article 5″, upto “Article 12″ to “Article 13″.
This can be achieved by the following vim substitution command.
:4,$s/\d\+/\=submatch(0) + 1/
- Range: 4,$ – 4th line to last line.
- Pattern to Search – \d\+ – digits sequence
- Pattern to Replace – \=submatch(0) + 1 – gets the matched pattern and adds 1 to it.
- Flag – as there is no flag, by default it substitutes only the first occurrence.
After executing the substitute statement the file will become like this, where you can
add the 3rd Article.
vi / vim tips & tricks series
Article 1: Vi and Vim Editor: 3 Steps To Enable Thesaurus Option
Article 2: Vim Autocommand: 3 Steps to Add Custom Header To Your File
Article 4: 5 Awesome Examples For Automatic Word Completion Using Ctrl-X
Article 5: Vi and Vim Macro Tutorial: How To Record and Play
Article 6: Tutorial: Make Vim as Your C/C++ IDE Using c.vim Plugin
Article 7: How To Add Bookmarks Inside Vim Editor
Article 8: Make Vim as Your Bash-IDE Using bash-support Plugin
Article 9: 3 Powerful Musketeers Of Vim Editor ? Macro, Mark and Map
Article 10: 8 Essential Vim Editor Navigation Fundamentals
Article 11: Vim Editor: How to Correct Spelling Mistakes Automatically
Article 12: Transfer the Power of Vim Editor to Thunderbird for Email
Article 13: Convert Vim Editor to Beautiful Source Code Browser
Note: Check the substitution changed the 3 to 4, 4 to 5 and so on. Now we can add a new line mentioning it as Article 3, and no need to do any manual changes.
Example 12. Substituting the sentence beginnings with upper case. ( i.e title case the entire document ).
While formatting a document, making the title case is also an important thing. It can be done easily with substitution.
:%s/\.\s*\w/\=toupper(submatch(0))/g
- \.\s*\w – Search Pattern – literal . ( dot ) followed by Zero or more space, and a word character.
- toupper – converts the given text to upper case.
- submatch(0) – returns the matched pattern.
Text before substitution:
Lot of vi/vim tips and tricks are available at thegeekstuff.com. reading
these articles will make you very productive. following activities can be
done very easily using vim editor.
a. source code walk through,
b. record and play command executions,
c. making the vim editor as ide for several languages,
d. and several other @ vi/vim tips & tricks.
Text after substitution (Changes are in bold)
Lot of vi/vim tips and tricks are available at thegeekstuff.com. Reading
these articles will make you very productive. Following activities can be
done very easily using vim editor.
a. Source code walk through,
b. Record and play command executions,
c. Making the vim editor as ide for several languages,
d. And several other @ vi/vim tips & tricks.
从 <http://www.thegeekstuff.com/2009/04/vi-vim-editor-search-and-replace-examples/> 插入
100 Vim commands every programmer should know
Aug 11, 2010 06:50:08 AM
Since the 70's, Vi is one of the programmer's best friend. Nevermind you're new to Vi or not, here's a big list of 100 useful commands, organized by topic, which will make your coder life better.
Basics
|
:e filename |
Open filename for edition |
|
:w |
Save file |
|
:q |
Exit Vim |
|
:w! |
Exit Vim without saving |
Search
|
/word |
Search word from top to bottom |
|
?word |
Search word from bottom to top |
|
/jo[ha]n |
Search john or joan |
|
/\< the |
Search the, theatre or then |
|
/the\> |
Search the or breathe |
|
/\< the\> |
Search the |
|
/\< ¦.\> |
Search all words of 4 letters |
|
/\/ |
Search fred but not alfred or frederick |
|
/fred\|joe |
Search fred or joe |
|
/\<\d\d\d\d\> |
Search exactly 4 digits |
|
/^\n\{3} |
Find 3 empty lines |
|
:bufdo /searchstr/ |
Search in all open files |
Replace
|
:%s/old/new/g |
Replace all occurences of old by new in file |
|
:%s/old/new/gw |
Replace all occurences with confirmation |
|
:2,35s/old/new/g |
Replace all occurences between lines 2 and 35 |
|
:5,$s/old/new/g |
Replace all occurences from line 5 to EOF |
|
:%s/^/hello/g |
Replace the begining of each line by hello |
|
:%s/$/Harry/g |
Replace the end of each line by Harry |
|
:%s/onward/forward/gi |
Replace onward by forward, case unsensitive |
|
:%s/ *$//g |
Delete all white spaces |
|
:g/string/d |
Delete all lines containing string |
|
:v/string/d |
Delete all lines containing which didn’t contain string |
|
:s/Bill/Steve/ |
Replace the first occurence of Bill by Steve in current line |
|
:s/Bill/Steve/g |
Replace Bill by Steve in current line |
|
:%s/Bill/Steve/g |
Replace Bill by Steve in all the file |
|
:%s/\r//g |
Delete DOS carriage returns (^M) |
|
:%s/\r/\r/g |
Transform DOS carriage returns in returns |
|
:%s#<[^>]\+>##g |
Delete HTML tags but keeps text |
|
:%s/^\(.*\)\n\1$/\1/ |
Delete lines which appears twice |
|
Ctrl+a |
Increment number under the cursor |
|
Ctrl+x |
Decrement number under cursor |
|
ggVGg? |
Change text to Rot13 |
Case
|
Vu |
Lowercase line |
|
VU |
Uppercase line |
|
g~~ |
Invert case |
|
vEU |
Switch word to uppercase |
|
vE~ |
Modify word case |
|
ggguG |
Set all text to lowercase |
|
:set ignorecase |
Ignore case in searches |
|
:set smartcase |
Ignore case in searches excepted if an uppercase letter is used |
|
:%s/\<./\u&/g |
Sets first letter of each word to uppercase |
|
:%s/\<./\l&/g |
Sets first letter of each word to lowercase |
|
:%s/.*/\u& |
Sets first letter of each line to uppercase |
|
:%s/.*/\l& |
Sets first letter of each line to lowercase |
Read/Write files
|
:1,10 w outfile |
Saves lines 1 to 10 in outfile |
|
:1,10 w >> outfile |
Appends lines 1 to 10 to outfile |
|
:r infile |
Insert the content of infile |
|
:23r infile |
Insert the content of infile under line 23 |
File explorer
|
:e . |
Open integrated file explorer |
|
:Sex |
Split window and open integrated file explorer |
|
:browse e |
Graphical file explorer |
|
:ls |
List buffers |
|
:cd .. |
Move to parent directory |
|
:args |
List files |
|
:args *.php |
Open file list |
|
:grep expression *.php |
Returns a list of .php files contening expression |
|
gf |
Open file name under cursor |
Interact with Unix
|
:!pwd |
Execute the pwd unix command, then returns to Vi |
|
!!pwd |
Execute the pwd unix command and insert output in file |
|
:sh |
Temporary returns to Unix |
|
$exit |
Retourns to Vi |
Alignment
|
:%!fmt |
Align all lines |
|
!}fmt |
Align all lines at the current position |
|
5!!fmt |
Align the next 5 lines |
Tabs
|
:tabnew |
Creates a new tab |
|
gt |
Show next tab |
|
:tabfirst |
Show first tab |
|
:tablast |
Show last tab |
|
:tabm n(position) |
Rearrange tabs |
|
:tabdo %s/foo/bar/g |
Execute a command in all tabs |
|
:tab ball |
Puts all open files in tabs |
Window spliting
|
:e filename |
Edit filename in current window |
|
:split filename |
Split the window and open filename |
|
ctrl-w up arrow |
Puts cursor in top window |
|
ctrl-w ctrl-w |
Puts cursor in next window |
|
ctrl-w_ |
Maximise current window |
|
ctrl-w= |
Gives the same size to all windows |
|
10 ctrl-w+ |
Add 10 lines to current window |
|
:vsplit file |
Split window vertically |
|
:sview file |
Same as :split in readonly mode |
|
:hide |
Close current window |
|
:nly |
Close all windows, excepted current |
|
:b 2 |
Open #2 in this window |
Auto-completion
|
Ctrl+n Ctrl+p (in insert mode) |
Complete word |
|
Ctrl+x Ctrl+l |
Complete line |
|
:set dictionary=dict |
Define dict as a dictionnary |
|
Ctrl+x Ctrl+k |
Complete with dictionnary |
Marks
|
mk |
Marks current position as k |
|
˜k |
Moves cursor to mark k |
|
d™k |
Delete all until mark k |
Abbreviations
|
:ab mail mail@provider.org |
Define mail as abbreviation of mail@provider.org |
Text indent
|
:set autoindent |
Turn on auto-indent |
|
:set smartindent |
Turn on intelligent auto-indent |
|
:set shiftwidth=4 |
Defines 4 spaces as indent size |
|
ctrl-t, ctrl-d |
Indent/un-indent in insert mode |
|
>> |
Indent |
|
<< |
Un-indent |
Syntax highlighting
|
:syntax on |
Turn on syntax highlighting |
|
:syntax off |
Turn off syntax highlighting |
|
:set syntax=perl |
Force syntax highlighting |
从 <http://www.catswhocode.com/blog/100-vim-commands-every-programmer-should-know> 插入
高效率编辑器 VIM-操作篇,非常适合 VIM 新手
Aug 11, 2010 06:48:25 AM
虽然从很久前就开始用 VIM 了,但一直都是半吊子,翻来覆去只用自己会的命令。最近为了提高书写代码的效率,还有 coding 时候的乐趣,又重新钻研了一下 VIM,发现了一篇很好的 VIM 入门的文章,原文是英文版的,我觉得非常适合 VIM 使用入门,所以翻译了过来。这里是简单的介绍了 VIM 的操作方式,并没有说为什么要用 VIM,如果你想知道答案可以去 Google,VIM 被誉为编辑器之神。
这篇教程写了在不同工作模式下使用 VIM 的一些基本技巧——即插入模式(insert mode), 命令模式(command mode), 存取文件等。目的是帮助刚刚接触 VIM 的新手更加有效率的使用这个出色的编辑器。
说明:在这篇文章里面,<C-X> 代表 Ctrl + X——就是按住 Ctrl 键然后再按 X。而且你可以在很多情况下使用 :help command 来获得大部分命令的帮助,这个是 VIM 的内部帮助文件命令。
高效率移动
在插入模式之外
基本上来说,你应该尽可能少的呆在插入模式里面,因为在插入模式里面 VIM 就像一个“哑巴”编辑器一样。很多新手都会一直呆在插入模式里面,因为这样易于使用。但 VIM 的强大之处在于他的命令行模式!你会发现,在你越来越了解 VIM 之后,你就会花越来越少的时间使用插入模式了。
使用 h、j、k、l
使用 VIM 高效率编辑的第一步,就是放弃使用箭头键。使用 VIM,你就不用频繁的在箭头键和字母键之间移来移去了,这会节省你很多时间。当你在命令模式时,你可以用 h、j、k、l 来分别实现左、下、上、右箭头的功能。一开始可能需要适应一下,但一旦习惯这种方式,你就会发现这样操作的高效之处了。
在你编辑你的电子邮件或者其他有段落的文本时,你可能会发现使用方向键和你预期的效果不一样,有时候可能会一次跳过了很多行。这是因为你的段落在 VIM 看来是一个大的长长的行。这时你可以在按 h、j、k 或者 l 之前键入一个 g,这样 VIM 就会按屏幕上面的行如你所愿的移动了。
在当前行里面有效的移动光标
很多编辑器只提供了简单的命令来控制光标的移动(比如左、上、右、下、到行首/尾等)。VIM 则提供了很多强大的命令来满足你控制光标的欲望。当光标从一点移动到另外一点,在这两点之间的文本(包括这两个点)称作被“跨过”,这里的命令也被称作是 motion。(简单说明一下,后面会用到这个重要的概念)
这里是常用到的一些命令(motion):
- fx:移动光标到当前行的下一个 x 处。很明显,x 可以是任意一个字母,而且你可以使用 ; 来重复你的上一个 f 命令。
- tx:和上面的命令类似,但是是移动到 x 的左边一个位置。(这真的很有用)
- Fx:和 fx 类似,不过是往回找。
- w:光标往前移动一个词。
- b:光标往后移动一个词。
- 0:移动光标到当前行首。
- ^:移动光标到当前行的第一个字母位置。
- $:移动光标到行尾。
- ):移动光标到下一个句子。
- ( :移动光标到上一个句子。
在整个文件里面有效移动光标
VIM 有很多命令,可以用来到达文件里面你想到达的地方。下面是一些在文件里面移动的命令:
- <C-F>:向下移动一屏。
- <C-B>:向上移动一屏。
- G:到文件尾
- numG:移动光标到指定的行(num)。(比如 10G 就是到第 10 行)
- gg:到文件首
- H:移动光标到屏幕上面
- M:移动光标到屏幕中间
- L:移动光标到屏幕下面
- *:读取光标处的字符串,并且移动光标到它再次出现的地方。
- #:和上面的类似,但是是往反方向寻找。
- /text:从当前光标处开始搜索字符串 text,并且到达 text 出现的地方。必须使用回车来开始这个搜索命令。如果想重复上次的搜索的话,按 n。
- ?text:和上面类似,但是是反方向。
- ma:在当前光标的位置标记一个书签,名字为 a。书签名只能是小写字母。你看不见书签的存在,但它确实已经在那里了。
- `a:到书签 a 处。注意这个不是单引号,它一般位于大部分键盘的 1 的左边。
- `.:到你上次编辑文件的地方。这个命令很有用,而且你不用自己去标记它。
高效的输入
使用关键词自动完成
VIM 有一个非常漂亮的关键词自动完成系统。这表示,你可以输入一个长词的一部分,然后按一下某个键,然后 VIM 就替你完成了这个长词的输入了。举个例子:你有一个变量名为 iAmALongAndAwkwardVarName 在你写的代码的某个地方。也许你不想每回都自己一个一个字母的去输入它。
使用关键词自动完成功能,你只需要输入开始几个字母(比如 iAmAL),然后按 <C-N>(按住 Ctrl,再按 N)或者 <C-P>。如果 VIM 没有给出你想要的词,继续按,直到你满意为止,VIM 会一直循环它找到的匹配的字符串。
聪明的进入插入模式
很多新手进入插入模式都只是用 i。这样当然可以进入插入模式,但通常不是那么合适,因为 VIM 提供了很多进入插入模式的命令。下面是最常用的一些:
- i:在当前字符的左边插入
- I:在当前行首插入
- a:在当前字符的右边插入
- A:在当前行尾插入
- o:在当前行下面插入一个新行
- O:在当前行上面插入一个新行
- c{motion}:删除 motion 命令跨过的字符,并且进入插入模式。比如:c$,这将会删除从光标位置到行尾的字符并且进入插入模式。ct!,这会删除从光标位置到下一个叹号(但不包 括),然后进入插入模式。被删除的字符被存在了剪贴板里面,并且可以再粘贴出来。
- d{motion}:和上面差不多,但是不进入插入模式。